The fields and dungeons, town exteriors and building interiors--any "stage" where the player moves around is called a map.
Games are made up from multiple maps, and the player can come and go among these various maps by way of events. For example, when a player steps into a doorway, you can set off an invisible event that will transport him or her to another map displaying the inside of that building. This is how all the maps appear to be connected to one another.
Maps may look like a single picture, but in fact it's made up of many pieces that fit together like a jigsaw puzzle. These small pieces are called tiles, and each tile contains information such as whether characters are allowed to pass through it.
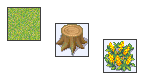
A collection of multiple tiles that represent certain settings, each with their own configuration, is called a tileset. Each map uses a single tileset whose tiles are then placed on the map. Tilesets also include information for battle backgrounds to be displayed during battles that take place on that particular map, so you automatically gain access to a setting-appropriate background just by selecting a tileset.
Map creation takes place in the map tree view, in the lower left of the main window.
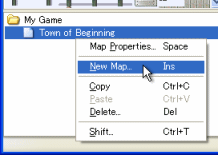
First, right-click on a map or a project folder and select [New Map] from the pop-up menu. You'll be shown a dialog box containing settings that cover the tileset to be used, the size of the map, and so on. Fill in the necessary information and click [OK]. Check the Pop-up hints for more information on each setting.
After the map has been configured, a new map will be created below the one you right-clicked initially. This has the same hierarchy as Windows folders. While this structure has no direct effect on the game, using it wisely can make it easier to manage a large number of maps; for example, by placing the interior maps of all the buildings in a village below the village map. You can change the hierarchy simply by dragging and dropping.
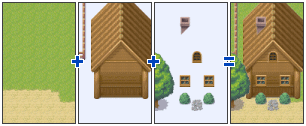
Maps have 3 layers, each one containing different tiles. You're free to place anything you like on any layer, but your mapmaking may go more smoothly if, as a general rule, you place land on layer 1, fences and buildings on layer 2, and windows and chimneys on layer 3.
Layers edited in the map editor can be selected with [Mode] on the main menu. You can also change various settings under the [View] menu, such as whether to darken all layers except the one you're currently working on.
The tiles you place on a map are selected from the tile palette on the left side of the main window. You can select multiple tiles at once by clicking and dragging within the tile palette. Selected tiles can then be placed in the map view, on the right side; it's a little like using a painting program.
Set the tile placement method with [Draw] on the main menu. Here's a rundown of the drawing tools and their capabilities:
Right-click on the map view with any drawing tool besides [Select] to select the tile placed at that point. This function is called the eyedropper. Making good use of the eyedropper can allow you to skip the tile palette altogether, increasing efficiency.
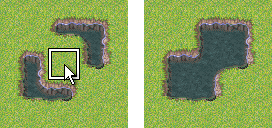
The tiles displayed in the very top row of the tile palette are a special variety called autotiles. Autotiles contain multiple patterns per tile type, automatically adjusting their borders as they're placed on the map.
Press [Shift] while placing tiles or using the eyedropper to temporarily disable the autotile function.
Double-click an autotile in the tile palette to make the Autotile Expansion dialog box appear. Here you can select autotile border patterns directly.
| Converted from CHM to HTML with chm2web Pro 2.85 (unicode) |