The fields and dungeons, town exteriors and building interiors--any "stage" where the player moves around is called a map.
Games are made up from multiple maps, and the player can come and go among these various maps by way of events. For example, when a player steps into a doorway, you can set off an invisible event that will transport him or her to another map displaying the inside of that building. This is how all the maps appear to be connected to one another.
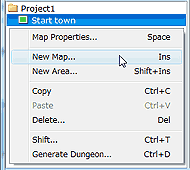
Map creation takes place in the map tree view, in the lower left of the main window.
First, right-click the map or the project folder and select "New Map" from the pop-up menu. Fill in the required settings for things like map size on the dialog that appears and click [OK]. See the pop-up help for the meanings of each of the setting items.
After the map has been configured, a new map will be created below the one you right-clicked initially. This has the same hierarchy as Windows folders. While this structure has no direct effect on the game, using it wisely can make it easier to manage a large number of maps; for example, by placing the interior maps of all the buildings in a village below the village map. You can change the hierarchy simply by dragging and dropping.
Maps may look like a single picture, but in fact it's made up of many pieces that fit together like a jigsaw puzzle. These small pieces are called tiles, and each tile contains information such as whether characters are allowed to pass through it.
The tiles you place on a map are selected from the tile palette on the left side of the main window. You can select multiple tiles at once by clicking and dragging within the tile palette. Selected tiles can then be placed in the map view, on the right side; it's a little like using a painting program.
Set the tile placement method with [Draw] on the main menu. Here's a rundown of the drawing tools and their capabilities:
Right-click on the map view to select the tile placed at that point. This function is called the eyedropper. Making good use of the eyedropper can allow you to skip the tile palette altogether, increasing efficiency.
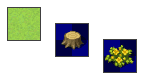
All of the tiles that can be used in game creation are displayed in the tile palette and are divided into 5 main sets, from A to E. Set A has terrain-based tiles such as ground and walls, and the other sets from B to E have decorative items such as trees and windows. Set E is a space for the user to add his own tiles and by default does not contain anything.
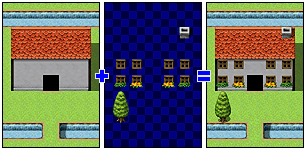
If, for example, you would like to make a plain with trees growing on it, you would first place a plains tile from Set A and then place tree tiles from Set B. The tree tiles will automatically be placed on top of the plains tiles.
In previous versions of RPG Maker, you made tiles overlap with one another by choosing which layers the tiles were on, but in this version it is possible to create maps without doing this.
Overlapping tiles will be grouped together, and can be selected by right clicking on them. Note that if you reposition a Set A tile that forms the base of other overlapping tiles, the tiles from Sets B through E that are on top of it will all be deleted.
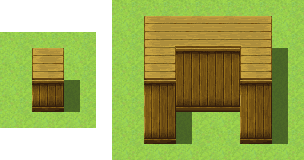
The top half of the tiles in Set A of the tile palette (the top 16) are special tiles called autotiles. Autotiles have a number of patterns, and will automatically adjust their borders to match how they are placed.
Some autotiles will automatically produce a shadow to the bottom right of the tile when two or more of the tiles are placed vertically. However, this does not apply to all tiles.
It is possible to temporarily turn off this feature by holding down the [Shift] key while placing or selecting tiles.
Settings for whether a tile can be passed through or not can be set for each tile. Although each tile has a default setting, this may be changed if necessary.
Select [Passage Settings] from the [Mode] menu on the main menu to display markers on the tile palette indicating whether a tile can be passed through. A circle mark indicates that the tile may be passed through, while an 'x' indicates an impassable tile. For tiles in Sets B through E, there is also a star symbol that indicates that the main character may pass behind the tile. The markers can be switched by clicking on them.
If the passage settings for overlapping tiles are different, the settings for the top tile are given priority.
Note that these passage settings are used for characters in the player's party. Vehicle settings are determined separately as shown below.
| Boat | Can only pass through ocean or water tiles from tile set A. |
|---|---|
| Ship | In addition to the tiles for Boat, the Ship can also pass through deep ocean tiles from tile set A. |
| Airship | Can pass through all tiles. However, it can only land on tiles that the player can pass through, not including the ocean, deep ocean, water, waterfall, woods, and bush tiles. It can also not land on top of an event. |
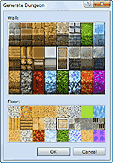
Dungeons are one of the most exciting parts of a game, but creating them from scratch can be very time consuming. This version of RPG Maker has a dungeon generation feature that greatly speeds up the process.
To generate a dungeon, right click on the map in the map tree view and select [Generate Dungeon]. After that, you merely have to select the tiles that will be used to make up the walls and floor of the dungeon and a maze-like dungeon of rooms connected by corridors will be automatically generated for you.
Dungeon generation will be performed on the entire map that you have selected, so if you want to make a large dungeon, make the map size large. If the map is too small, the dungeon that is generated will not seem much like a dungeon.
It is possible to break up one map into a number of different areas as needed. Since it is possible to set groups of enemies for the player to encounter in a particular area, you can use areas to fine-tune the locations where certain enemies appear.
To create an area, right-click on a map in map tree view and select [New Area]. The area will be created for the selected map. You can select the range that the area will cover by clicking on [Area Position] in the window that will appear. Drag within the displayed map to set the rectangular shape of the area.
Now all you have to do is set an enemy group for [Encounters] and that enemy group will only appear in the area you have selected. The encounter rate depends on the settings for the map on which the area was created.
| Converted from CHM to HTML with chm2web Pro 2.85 (unicode) |